Examining sprouting in a jar
 Plant seeds can easily be grown outside of soil so that they can be examined while sprouting. Line a glass jar with a piece of paper towel so that the edge of the towel touches the bottom of the jar. Dampen the towel and put a little water in the bottom of the jar. Put a few beans or corn seeds between the paper and the glass, about halfway down. The paper should hold them in place. Keep the paper moist but not soggy. Place the jar in a sunny location. In a few days the seeds will sprout, first sending roots downward, followed by stems above. The beans are dicots, meaning they will sprout with two little seed leaves.
 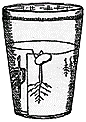 The corn is a monocot and sprouts with a single blade. Early in their growth, the seedlings use the food stored in the seed. Eventually, they will need to be planted in soil so that they will have minerals for growth.
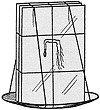 You can also do this by layering a piece of paper towel between two small pieces of glass. The towel, which is the same size as the glass, is placed on the first piece of glass. It is then dampened and a few small seeds, such as radish seeds, are placed on it. The second sheet is placed on top and the whole thing is secured with string or rubber bands. It is then placed in a shallow pan and held upright by lashing it with pieces of string. Add a little water to the pan, which will keep the paper towel moist. Eventually the seeds will sprout. If the glass is turned a quarter of the way around after the roots are somewhat established, they will bend to grow towards the water. No matter how you turn the glass, the roots will grow downward.
Growing plants from food seeds and tubers
 Many fruit and vegetable seeds, such as orange, grapefruit, apple, lemon or tomato seeds, can easily be sprouted indoors. Plant them in small pots filled with good garden soil. The seeds should be planted about twice as deep as they are wide. They will sprout at different rates depending on the seed, the citrus fruits usually taking the longest. Avocado pits can be sprouted by sticking toothpicks in the side to form a support that will hold it in the top of a glass or jar filled with water. The wide end of the seed should be just submerged in the water - this is the end where the root will emerge. Keep the glass filled with water and before too long you will have a plant that can be transplanted to a flowerpot. Cuttings from potatoes and sweet potatoes can be grown in a similar way. Make sure your cutting has at least one "eye", which is where the potato vine will grow. The eye needs to be out of the water. Carrot tops will also grow this way if the root end is kept submerged. All of these plants need to be transplanted to soil eventually, as water alone will not supply nutrients for the plant to continue to grow.
Moss terrarium
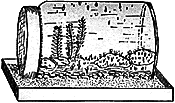 Mosses can be grown in terrariums fairly easily. Collect moss from an area where it is okay to do so and transport in plastic sandwich bags. Sprinkle with water and seal the bag if you won't be setting up the terrarium right away. Use a large, clean glass jar with a tight fitting lid. Lay it on its side in a shallow box or on a stand so that it will not roll. Place sand and pebbles about ½ inch thick in the bottom of the jar. On top of this place some of the soil from the same place where the moss will be collected, or mix a soil of charcoal, light gravel, leaf mold and garden soil. The soil should be level with the opening of the jar. A little sulfur scattered on the soil will help to prevent mold from growing. Plant the moss by pressing it into the soil. Water the terrarium, screw the cover on, and place it in a shady place. If it seems too wet, leave the lid off for a few hours to allow some of the water vapor to escape. Eventually you will get the balance of water just right, and the moss should thrive. The terrarium should sustain itself for several weeks or months without needing additional water if the lid is kept tightly on. If conditions are just right, the moss may eventually send up little stalks. Some of these stalks form spores that will fall to the soil and germinate into new plants.
Lichens
Lichens grow on rocks, in poor soil, and other places where many plants cannot grow. They are a symbiotic combination of two organisms: a fungus, which anchors the plant and collects water, and an algae, which is a green plant that provides food. They often grow on rocks and are part of the erosion process, slowly breaking the rock down into soil. Lichens can be collected for terrariums. Keep in mind that some species of lichen are endangered and protected by law, so be sure it is okay to harvest a particular species from wherever you have found it. Once collected, place in a terrarium with a soil of 1 part loam, 1 part sand, and 2 parts humus. Add a few twigs and small rocks. Water, but don't over water or mold may form. Seal with a tight fitting lid and place in a sunny but cool location. Usually, even dry lichens that appear dead will soon thrive in the humid terrarium.Mold garden
 Mold is a fungus and relies on whatever it is growing on for nutrients. It grows from spores, which float through the air and begin to grow when they land on a good source of food in a warm, damp place. You easily grow certain varieties for study on a piece of bread. Sprinkle a piece of bread with water, and let it stand for about an hour. Place it in a jar and screw the lid on tightly. Put the jar in a warm, dark place. In two or three days the bread should be covered with white cottony material and small black dots. This is common bread mold. Any other colors seen are from other varieties of mold. If you look at it under a magnifying glass or low power microscope, you will see that the white material is actually threadlike. This is the mycelium, and is the same structure as the "root" of a mushroom (not a true root). Some of the mycelium branches upward, ending in sporangia, or spore cases, containing many spores that will eventually burst free and float away to form new plants. Discard the bread after examining.
Yeast is also a fungus, and gives off carbon dioxide as it grows. This carbon dioxide is what gives lightness to yeast breads and bubbles (and alcohol) to beer. If you put a little baking yeast into a cup of sugar water and let stand in a warm place for a few minutes, you should be able to see the yeast plants budding to from new plants.
Plant lore
The colored water and celery trick
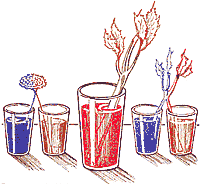 Water normally enters a plant through its roots. It is carried upwards to all parts of the plant by means by capillary action. You can make the tubes that carry water through a plant easier to see with a class of water that has been dyed with food coloring. Set a whole carrot (without its green top) in a glass of water dyes with food coloring - red works the best. Let the carrot sit overnight. Remove it from the glass, and slice off a section from the top. Slice the bottom part lengthwise and you can easily see where the water has flowed. The tubes that carry the water, by the way, are called xylem.
This is much more dramatic with a celery stalk. Place the stalk (with leaves) in the dyed water for three hours or so. The water will be carried up through the stalk and out to the leaves, which will be dyed. If another stalk is partly split in half from the bottom, and each half is placed in a different color of water (red and blue, perhaps), then each half will be colored a different shade. The same thing can be done with a white carnation.
Chlorophyll
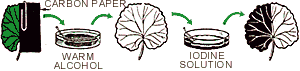
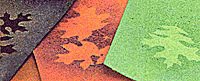
Green plants are green because of chlorophyll, which is the chemical responsible for photosynthesis of the plant's food. During the daylight, the plant takes in carbon dioxide, water, and minerals from the ground and air. The chlorophyll, housed in individual cells within tiny bodies called chloroplasts, enables the plant to make sugar (glucose) with the raw materials it takes in, using sunlight as energy. The byproduct is oxygen, which is expelled through tiny openings called stomata, located in the bottoms of the leaves. You can see this oxygen bubbling off water plants in an aquarium. The glucose is stored in the leaves as starch.If a plant, or part of a plant, is grown totally without sunlight, chlorophyll will not develop. Cover half of a leaf (still attached to the plant) with black paper (geraniums work well for this). Put the plant in sunlight for 48 hours. Remove the black paper and one half of the leaf should be yellowish. Chlorophyll will break down if it does not receive sunlight for an extended period of time. The base color of many leaves is yellow, which is why some leaves turn yellow in the autumn; the other fall colors are due to chemical changes within the leaves. Remove the leaf from the plant and soak it in warm alcohol until the chlorophyll has been removed from it. If the leaf is now dipped in iodine solution, the part that has received sunlight will turn blue, as iodine turns blue in the presence of starch.
Bleaching flowers to show chlorophyll
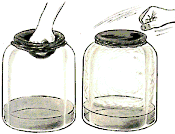
Tie several different colored flowers together at the stems. Place a little ammonia in the bottom of a large jar. Suspend the flowers from the top of the jar either by passing the string through a plastic lid that fits the jar or by attaching a strip of wood, wire, etc. across the mouth of the jar that the flowers can be hung from and sealing with plastic wrap. The flowers should not touch the ammonia. In a few minutes, the colors will fade from some of the flowers, especially any reds, purples, or pinks (not so much with white or yellow). The petals of some of the flowers will appear greenish due to the chlorophyll within.
Preserving plants
Pressed plants
Leaves, stems and flowers that are not too thick are best for pressing. Always make certain that you are not picking leaves or flowers from species that are protected. To make a press, start with two thin but sturdy pieces of wood that are larger than the plants you will be pressing. On the bottom of one, nail two leather straps or old belts. Or you can simply use two pieces of light rope to bind the press together. Layer sheets of cardboard and newspaper between the wooden boards. Place the plants between the newspaper sheets, binding the whole thing together each time you do so. Whenever known, make a note of the type of plant when it is collected. If you only have a few plants to press, you can do so simply by placing them between sheets of newspaper and weighting them for a few days. It is best to change the newspapers each day until the plant is thoroughly dry. You can display the dried and labeled plants on a sheet of heavy paper by gluing or taping them down (spots of rubber cement work well), or you can laminate them between plastic, which will keep insects away from them.Preserving leaves with glycerin
Some of the more stout leaves, such as holly, magnolia, and some of the maples, can be preserved without flattening them by using glycerin, which is still readily available in many pharmacies. By trial and error you can determine which types of leaves work best by this method. The leaves used should be very fresh. Add 2 parts boiling water to 1 part glycerin. Place the leaf in the warm glycerin solution so that its petiole (stem) is submerged 3-4 inches (7-10 cm). How long the process takes depends on the type of leaf, but you will know enough has been absorbed when drops of glycerin appear on the surface of the leaf. Remove the leaf from the solution and wipe to remove any excess. Drain on thick stacks of newspaper for a few days, then wash (not too rough!) with a little soap and water. Hang on a line (wooden clothespins are useful here) to dry.You can capture fall colors in leaves fairly well using this method. Pick the leaves just as they are turning. If they have completely turned or have fallen from the tree they probably won't absorb much of the glycerin solution. You can also preserve branches (twiglets and leaves) fairly well, but it will require quite a bit of glycerin, so it may be cost prohibitive. If you do want to try a small branch, the entire thing needs to be immersed in a warm solution of 1 part glycerin to 1 part water. Leave it in for at least double the time that it takes for one leaf from the same plant to complete using the single leaf method.
Drying flowers
To preserve the shape of flowers, pour an inch or so of borax into the bottom of a small cardboard box. Sturdy flowers work best for this. Set the cut flowers, stem side down, into the borax. Slowly and carefully cover the flowers with more borax, and set the box in a sunny place for 2 or 3 weeks (delicate flowers dry faster - a week or so). Carefully pour off the borax and save for the next drying. The flowers will be fragile, but the shape and much of the color should be preserved. Fine white sand can be substituted if borax can't be found.Leaf prints
 Leaf prints are a good way of making a record of the size and shapes of leaves of various trees. First, collect a leaf or two from a specific tree. Identify the tree whenever possible and not this with the leaves. The leaves chosen should be as free from holes and tears as possible. It is better (for the tree anyway) if you can find good leaves that have fallen from the tree. Place the leaves in a press (several thickness of newspapers topped with a weight) to flatten. This should only take a day or two, depending on the thickness of the leaf. Prepare a workspace by covering a table with newspapers. Pour some colored ink into a small dish, and dip an old toothbrush into the ink. Practice making spatters by scraping a short stick toward you (not away) through the bristles. This causes the ink to spatter away from you. You can also run the toothbrush over a fine mesh screen held over the leaf. Practice until you can get a fine, controlled spatter. Place the leaf onto a piece of art paper and spatter around the edges of the leaf.
Smoke prints
Cover the side of a smooth, round bottle with a thin layer of grease or Vaseline. Fill it with cold water and cap tightly. Hold it over a candle flame, spinning it, until it is covered with an even layer of soot. Place a leaf, vein side up, on a piece of newspaper. Roll the soot-covered bottle over the leaf, then move the leaf to a clean newspaper, soot side up. Cover it with a sheet of white paper and roll with a clean bottle or rubber roller. You can make the print smudge resistant by spraying it with an artist's fixative coating.Leaf skeletons
You can "skeletonize" a fresh leaf, green to expose the lacy pattern of veins it uses to transport food. Make a beating board by tacking an old piece of carpet or a thick rag to a board. Use an old shoe brush or hairbrush. The type of brush chosen is very important. It should be fairly fine but not stiff. Most synthetic brushes are too harsh. Once an appropriate brush has been located, place the leaf, top side up, on the beating board. Hold the leaf firmly in place and tap lightly until all of the fleshy part is gone. Occasionally, you will need to turn the leaf to the back side to tap it with the brush. Once the leaf has been skeletonized, you can display it in a scrapbook by gluing it to a piece of paper with a few small dabs of glue. Cover with cellophane. A nicer display can be made by sandwiching the leaf "skeleton" between two same-size pieces of glass sealed at the edges with adhesive tape.Spore prints
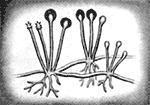
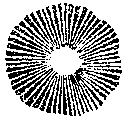 Mushrooms are a fungus and have no chlorophyll. They must get their food from whatever they are growing on. They also have no seeds, and reproduce by means of spores. The spores of a mushroom are located in the gills under the cap. You can make a print of the mushroom using its spores. Each print will be unique to the species of mushroom. Remember when handling mushrooms that many of them are poisonous and some can make you very sick or even kill you if you eat even a tiny bit. Unless you are an expert never eat any mushrooms you find in the wild. Wash your hands after handling any wild mushroom. To make a print, first choose a mushroom with an open cap and exposed gills. Ordinary grocery store variety mushrooms work fine. It should be fairly fresh. Identify the mushroom using a field guide if you are able so that you can label the print later. Remove the cap from the stem. Choose an appropriate piece of paper; dark paper if the spores are light, and light paper they are dark. Place the cap on the paper, gills down. Cover it with a dish so that the spores will not be carried away by air currents and leave it overnight. When the cap is removed, there will be a spore print on the paper.
To make the print more permanent, The paper will need to be covered with a thin coating of gum arabic, which is available from most art supply stores. Spread this thinly over the paper. Three toothpicks will need to be pushed through the mushroom cap so that it sits, tripod style, just barely above the paper. Mucilage can be substituted for the gum arabic if it is allowed to nearly dry, but it does not work quite as well. Egg whites will also work if spread thinly.
Bizarre garden http://bizarrelabs.com/plant1.htm
Amazing fun science activities: Bizarre Stuff Catalogue
| GASSES AND LIQUIDS |
| ATMOSPHERIC CAN CRUSH | BUBBLES AND BUBBLE TANK |
| CARTESIAN DIVER | DANCING MOTHBALLS AND RAISINS |
| SOUND RINGS | STEAM ENGINES, SUPER SIMPLE |
| STUPID EGG TRICKS | |
| FORCE, MOTION AND BALANCE |
| GUM WRAPPER POPPER | HARMONOGRAPH |
| ROCKET, MATCH STICK | STEAM ENGINES, SUPER SIMPLE |
| STUPID EGG TRICKS | |
| LOCOMOTION AND FLIGHT |
| AIRSHIP | HOVERCRAFT MODEL |
| ROCKET, MATCH STICK | STEAM ENGINES, SUPER SIMPLE |
| TEMPERATURE |
| ATMOSPHERIC CAN CRUSH | SOLAR OVEN |
| SOUND AND LIGHT |
| EDISON'S PHONOGRAPH | MICROSCOPE - LEEUWENHOEK TYPE |
| PERISCOPE | PINHOLE CAMERAS- A SIMPLE CAMERA |
| PINHOLE PAGE 2 - BASIC THEORY | PINHOLE PAGE 3 - OPTIMIZATION |
| SOUND RINGS | TELESCOPE, SIMPLE |
| ELECTRICITY |
| CRYSTAL RADIO | ELECTRIC LEMON |
| ELECTROMAGNETS | ELECTROMAGNETIC HORN |
| ELECTROMAGNETIC HORN | FOXHOLE RADIO |
| LEYDEN JAR | LEMON, ELECTRIC |
| MICROPHONE, VERY BASIC CARBON | MOTORS, PAGE 1 |
| MOTORS, PAGE 2 | MOTOR, AMAZINGLY SIMPLE |
| SECONDARY COIL | SPARKING BUCKETS |
| TESLA COIL | |
| ATOMIC |
| CLOUD CHAMBER | |
| CHEMISTRY |
| BLOOD, PROP | BUBBLES AND BUBBLE TANK |
| CRYSTAL GARDEN | CRYSTALS |
| EGGS: "SECRET MESSAGE" EGGS | GLASS, FAKE |
| GLUE | HUMIDITY INDICATOR |
| INK | INK, INVISIBLE |
| LITMUS | NON-DAIRY CREAMER BALLISTICS |
| SLIME: THE BIG PAGE OF SLIME | SUGAR CUBE TRICKS |
| TRANSFER INK | VOLCANO |
| LIFE |
| CASTING ANIMAL TRACKS | CELERY AND COLORED WATER TRICK |
| CRICKET LORE | MEASURING THE HEIGHT OF A TREE |
| MICROSCOPE - LEEUWENHOEK TYPE | THE BIZARRE GARDEN - PLANT LORE |
| UNDERWATER OBSERVATION GLASS | |
| EARTH, WEATHER AND ASTRONOMY |
| CLOUDS IN A BOTTLE | COSMIC RAY DETECTOR |
| CRYSTALS | CRYSTAL GARDEN |
| HUMIDITY INDICATOR | HUMIDITY METER, SIMPLE |
| HURRICANE MACHINE | MICROMETEORITES |
| SEISMOGRAPH | SNOWSTORM IN A CAN |
| SOLAR OVEN | TELESCOPE, SIMPLE |
| VOLCANO | |
| COMMUNICATIONS AND ARTS |
| ANIMATION TOYS - THE PERSISTENCE OF VISION PAGE | BLOOD, PROP |
| CRYSTAL RADIO | FOXHOLE RADIO |
| GLASS, FAKE | MICROPHONE, VERY BASIC CARBON |
| EDISON'S PHONOGRAPH | PINHOLE CAMERAS- A SIMPLE CAMERA |
| PINHOLE PAGE 2 - BASIC THEORY | PINHOLE PAGE 3 - OPTIMIZATION |
| SAWS, MUSICAL | SOUND EFFECTS: BOING BOXES |
| TRANSFER INK | |
| SOCIAL SCIENCES |
| SHRUNKEN HEAD | |
| MISC. AND EQUIPMENT |
| FIRE STARTING WITH BOW & DRILL | MICROSCOPE - VERY SIMPLE LEEUWENHOEK TYPE |
| MOTOR, PSYCHIC | RANGE FINDER |
| SEISMOGRAPH | SOLAR OVEN |
| SUGAR CUBE TRICKS | TELESCOPE, SIMPLE |
| UNDERWATER OBSERVATION GLASS | |
Clouds in a bottle
Making your own fake shrunken head
 There are several ways to model a shrunken head. For example, you can craft a nice little replica if you are handy with papier-mache. Or you can do it the classic way, using an apple. This isn't the most realistic version, but it will make a nice little gnarled head, and has the advantage of actually shrinking in the process, adding a random factor to the creation. In the 1960's, there was a kit sold, featuring actor Vincent Price, that provided hair, beads, feathers, etc. to use with apples to make shrunken heads.
Underwater observation glass
No comments:
Post a Comment