Head to dynamic earth for research
Does my device need to be eye catching, fun, exciting, how do I keep people engaged for a long time? sharing? discovery pod?
also discover place in Carolina , learning through play
How combine some sort of gamification into device
Sunday, 27 November 2011
Saturday, 26 November 2011
Geddes view of technology and natural education and CIVICS
"In Nature's infinite book of mystery I can a little read."

Patrick Geddes, Outlook tower guide
Man lives by deeds not knowledge. His knowledge is to help him to act: he does not live to know but knows to enable him to live a richer and fuller life.
Comments written on Outlook tower guidebook

‘Vivendo Discimus’ by living we learn inscribed on Riddlers Court Archway, Edinburgh.
Dates back to 1889 when Geddes started Edinburgh university summer schools.
Geddes Evolution of Education:
education was not to be seen as one of his manifold activities, because for Geddes education was “the activity” that would move forward the Ascent of Man towards a better future.
Geddes was sure that human potential could be improved through education, therefore education was the key to rise quality of life in the future.
Geddes saw that new technology would bring about rapid development.
He was not anti-technology as such, but he foresaw that technology would give us the means to kill and pollute our natural environment on an ever greater scale than before.
In order to avoid the inevitable doom, he devoted his life to try to see a way forward to a new cultural era. He had to go on hoping that the environment could be controlled by conscious and well informed choices made by informed individuals.
His quest for a new kind of evolutionary education and the nature of knowledge therefore became first priority.
He went back to first principles about how people learn(how do people learn?) and about what methods are most appropriate. His motto “Vivendo Discimus” or “By Living We Learn” was meant to be a spur for action, there was no end to this search.
The main reason for organising his famous Summer Meetings in Edinburgh, indeed some of them inRiddle’s Court, was to test his ideas and methods on real people hoping to
help participants understand more about themselves and their environment.
because of his objectivity and creativity, he tried to
create a new subject which he called “Civics”.
This was a discipline directed both towards reclaiming human individual creativity and the improvement of the environment.
In some of his thinking machines he tried to plot the interaction between the structure and the process in a system of education. In his model he included the feelings, the thoughts and the experience of individuals because it is
feelings
and sense
and thought
which are important in realising creativity.
It was as far away from any formal school than you can ever imagine.
The objective was not to train in some skill or other and get a piece of paper or certificate at the end of it.
Geddes, in his Summer meetings, prepared a magnificent banquet of lectures, visits excursions, concerts and practical work and invited people to tuck in and enjoy it. After all this was holiday time.
Model for new Patrick Geddes Centre for evolutionary education
Produced by Sofia G.Leonard
(very similar to my work!!)

The vision is to establish in Riddles Court a world class learning Centre to contribute to the creation of a learning society promoting active, critical citizenship informed by a twenty-first century dialogue around the principles of the Geddes’ evolutionary education.
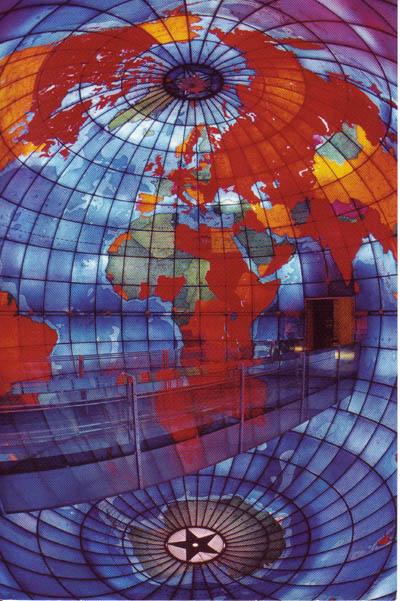
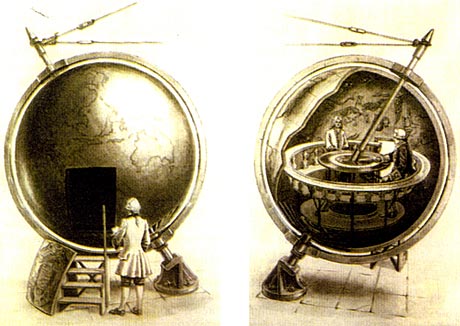
Hollow Globe (Episcope) sold at outlook tower
Hollow Globe sold at the Outlook Tower and intended for the teaching of geography.
The brilliant principle of this concave globe was to make cartographic and perspective projection coincide. The geometric construction of the globe was stereographic, i.e. the projection was centred on the surface of the globe. The point chosen was Edinburgh, coinciding exactly with the location where the map was to be seen, so the Episcope presented visitors with what they would have seen if their vision had been capable of stretching across the surface of the earth to countries and continents hidden beyond the horizon. In short, it was a kind of panoramic mappa mundi.
http://patrickgeddes.co.uk/feature_eleven.htmlEpiscope also known as a magic lantern or overhead projector used in schools = device which displays opaque materials by shining a bright lamp onto the object from above.


Magic Lantern Projector - Rare By Kershaw - Science/Demonstration.

modern day overhead projector
see also...
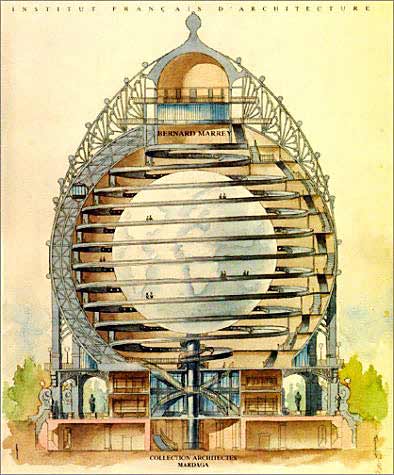
Wyld's Great Globe(giant hollow globe)

an attraction situated in London'sLeicester Square between 1851 and 1862, constructed byJames Wyld (1812–1887), a distinguished mapmaker and former Member of Parliament for Bodmin.
At the centre of a purpose-built hall was a giant globe, 60 feet 4 inches (18.39 m) in diameter. The globe was hollow and contained a staircase and elevated platforms which members of the public could climb in order to view the surface of the earth on its interior surface, which was modelled in plaster of Paris, complete with mountain ranges and rivers all to scale.Punch described the attraction as "a geographical globule which the mind can take in at one swallow."[1] In the surrounding galleries were displays of Wyld's maps, globes and surveying equipment.

Plans for the great globe, 1851
including exterior galleries

Wyld's guide book to the globe

The Mapparium, a 20th-century take on the concave globe
In Christian Science Plaza, Boston

The Gottorp Globe first modern Planiterium, 1664
Recluses Globe
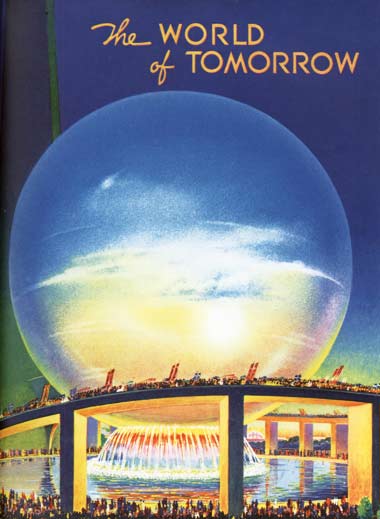
Centerpiece of New York World's fair, giant ball housing a model of a utopia garden. 1939
“symbol of a perfectly integrated, futuristic metropolis pulsating with life and rhythm and music.”
Thursday, 24 November 2011
Biosphere connected to computer idea
biosphere base station and computer facilitator
start off project where it asks questions to user: what is needed to sustain life? light heat, water.
type in.
project on inside back of glass container or presented in computer app.
White base station- glows green when connected.
Then a print out reciept what need for life system.
people then come back to device and add ingredients.
As system continues it could send random open questions through internet to user or could have sensors which detect changes and relay back appropriate questions.
whew getting a bit hot in here, how do you think warming effects your creatures? how does heating up the planet effect the earths creatures? how do we heat up the earth?
warning warning nitrate levels at full capacity please reduce plant life. your creatures are in danger.
Balance seems to be achieved. Where else do you find balance and harmony?
Answers can be typed back through laptop and then posted on a share website.
aimed at user from home studying biosphere and educational aid on biosphere.
Krstyna Pojerova terrarium and pendant lamp
hanging terrarium also doubles as a pendant lamp, adding both light and life to any room.


Read more: Glasshouse Combines a Pendant Lamp with a Terrarium | Inhabitat - Green Design Will Save the World
The terrarium lamp is made from an onion shaped glass orb. Rather than just an access hole to change the light bulb, the bottom of the glass inverts inside, forming a protective lip around the opening. This holds all the goodies inside, and provides the perfect amount of space to support a new mini garden! Through the opening, you can cultivate your fresh herbs, pick small flowers, or simply water the little green plants.
The lamp portion shines down on your little garden, supporting photosynthesis even in dim spaces, and the excess heat produced by the bulb incubates your fresh herbs, keeping them happy and healthy. There’s also plenty of room to water your plants, and also room for soil. Holes on the top of the orb allow healthy plants to sprout through — but they may need a little guidance.
The Glasshouse was created to foster the urban kitchen, and let city dwellers with no outdoor or window space grow their own fare in a unique way. Aside from adding life to a room, the hanging lamp adds a punch of color and a beautiful design.
The Glasshouse can be ordered from the Czech site Art-Light.
Art-light | Skleník - OstatníRead more: Glasshouse Combines a Pendant Lamp with a Terrarium | Inhabitat - Green Design Will Save the World
Fun nature discovery activities
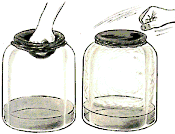
Examining sprouting in a jar
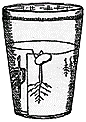 The corn is a monocot and sprouts with a single blade. Early in their growth, the seedlings use the food stored in the seed. Eventually, they will need to be planted in soil so that they will have minerals for growth.
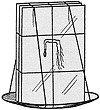
![]() You can also do this by layering a piece of paper towel between two small pieces of glass. The towel, which is the same size as the glass, is placed on the first piece of glass. It is then dampened and a few small seeds, such as radish seeds, are placed on it. The second sheet is placed on top and the whole thing is secured with string or rubber bands. It is then placed in a shallow pan and held upright by lashing it with pieces of string. Add a little water to the pan, which will keep the paper towel moist. Eventually the seeds will sprout. If the glass is turned a quarter of the way around after the roots are somewhat established, they will bend to grow towards the water. No matter how you turn the glass, the roots will grow downward.
You can also do this by layering a piece of paper towel between two small pieces of glass. The towel, which is the same size as the glass, is placed on the first piece of glass. It is then dampened and a few small seeds, such as radish seeds, are placed on it. The second sheet is placed on top and the whole thing is secured with string or rubber bands. It is then placed in a shallow pan and held upright by lashing it with pieces of string. Add a little water to the pan, which will keep the paper towel moist. Eventually the seeds will sprout. If the glass is turned a quarter of the way around after the roots are somewhat established, they will bend to grow towards the water. No matter how you turn the glass, the roots will grow downward.
Growing plants from food seeds and tubers

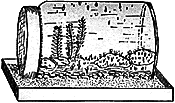
Moss terrarium
Lichens
Mold garden
![]() Yeast is also a fungus, and gives off carbon dioxide as it grows. This carbon dioxide is what gives lightness to yeast breads and bubbles (and alcohol) to beer. If you put a little baking yeast into a cup of sugar water and let stand in a warm place for a few minutes, you should be able to see the yeast plants budding to from new plants.
Yeast is also a fungus, and gives off carbon dioxide as it grows. This carbon dioxide is what gives lightness to yeast breads and bubbles (and alcohol) to beer. If you put a little baking yeast into a cup of sugar water and let stand in a warm place for a few minutes, you should be able to see the yeast plants budding to from new plants.
Plant lore
The colored water and celery trick
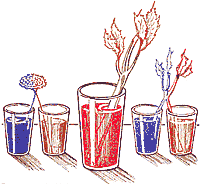
![]() This is much more dramatic with a celery stalk. Place the stalk (with leaves) in the dyed water for three hours or so. The water will be carried up through the stalk and out to the leaves, which will be dyed. If another stalk is partly split in half from the bottom, and each half is placed in a different color of water (red and blue, perhaps), then each half will be colored a different shade. The same thing can be done with a white carnation.
This is much more dramatic with a celery stalk. Place the stalk (with leaves) in the dyed water for three hours or so. The water will be carried up through the stalk and out to the leaves, which will be dyed. If another stalk is partly split in half from the bottom, and each half is placed in a different color of water (red and blue, perhaps), then each half will be colored a different shade. The same thing can be done with a white carnation.
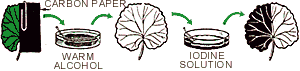
Chlorophyll
![]() If a plant, or part of a plant, is grown totally without sunlight, chlorophyll will not develop. Cover half of a leaf (still attached to the plant) with black paper (geraniums work well for this). Put the plant in sunlight for 48 hours. Remove the black paper and one half of the leaf should be yellowish. Chlorophyll will break down if it does not receive sunlight for an extended period of time. The base color of many leaves is yellow, which is why some leaves turn yellow in the autumn; the other fall colors are due to chemical changes within the leaves. Remove the leaf from the plant and soak it in warm alcohol until the chlorophyll has been removed from it. If the leaf is now dipped in iodine solution, the part that has received sunlight will turn blue, as iodine turns blue in the presence of starch.
If a plant, or part of a plant, is grown totally without sunlight, chlorophyll will not develop. Cover half of a leaf (still attached to the plant) with black paper (geraniums work well for this). Put the plant in sunlight for 48 hours. Remove the black paper and one half of the leaf should be yellowish. Chlorophyll will break down if it does not receive sunlight for an extended period of time. The base color of many leaves is yellow, which is why some leaves turn yellow in the autumn; the other fall colors are due to chemical changes within the leaves. Remove the leaf from the plant and soak it in warm alcohol until the chlorophyll has been removed from it. If the leaf is now dipped in iodine solution, the part that has received sunlight will turn blue, as iodine turns blue in the presence of starch.
Bleaching flowers to show chlorophyll
Preserving plants
Pressed plants
Preserving leaves with glycerin
![]() You can capture fall colors in leaves fairly well using this method. Pick the leaves just as they are turning. If they have completely turned or have fallen from the tree they probably won't absorb much of the glycerin solution. You can also preserve branches (twiglets and leaves) fairly well, but it will require quite a bit of glycerin, so it may be cost prohibitive. If you do want to try a small branch, the entire thing needs to be immersed in a warm solution of 1 part glycerin to 1 part water. Leave it in for at least double the time that it takes for one leaf from the same plant to complete using the single leaf method.
You can capture fall colors in leaves fairly well using this method. Pick the leaves just as they are turning. If they have completely turned or have fallen from the tree they probably won't absorb much of the glycerin solution. You can also preserve branches (twiglets and leaves) fairly well, but it will require quite a bit of glycerin, so it may be cost prohibitive. If you do want to try a small branch, the entire thing needs to be immersed in a warm solution of 1 part glycerin to 1 part water. Leave it in for at least double the time that it takes for one leaf from the same plant to complete using the single leaf method.
Drying flowers
Leaf prints
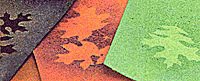
Smoke prints
Leaf skeletons
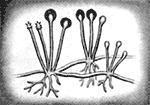
Spore prints
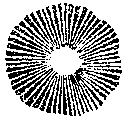
![]() To make the print more permanent, The paper will need to be covered with a thin coating of gum arabic, which is available from most art supply stores. Spread this thinly over the paper. Three toothpicks will need to be pushed through the mushroom cap so that it sits, tripod style, just barely above the paper. Mucilage can be substituted for the gum arabic if it is allowed to nearly dry, but it does not work quite as well. Egg whites will also work if spread thinly.
To make the print more permanent, The paper will need to be covered with a thin coating of gum arabic, which is available from most art supply stores. Spread this thinly over the paper. Three toothpicks will need to be pushed through the mushroom cap so that it sits, tripod style, just barely above the paper. Mucilage can be substituted for the gum arabic if it is allowed to nearly dry, but it does not work quite as well. Egg whites will also work if spread thinly.
Bizarre garden http://bizarrelabs.com/plant1.htm
Bizarre Stuff Catalogue
Clouds in a bottle
Making your own fake shrunken head

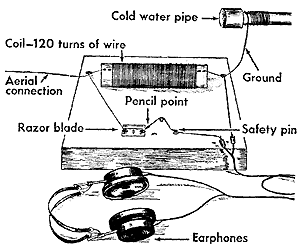
Foxhole radio - Bizarre Labs good to make for a competition for the electronic part of skill share
Underwater observation glass
Subscribe to:
Posts (Atom)